Instructions for use
Please read completely before plugging in.
A new amp will sound bright and closed in until properly broken in. I have seen amps change 15 volts from new to broken in. It is a process that takes place as the atoms in the parts aligne to the flow of electricity. Please do not do any critical listening until the amp has at least 100 hours of play time. It will still continue to break in as the large film capacitors take hundreds of hours to be fully broken in. When using a cartridge with an output of less than .4mV you may need to used a head amp as the noise level may become too loud.
Check box for signs of obvious damage during shipment.
Remove screws on cover of box to set dip switches.
Do not power the unit up until you have set dip switches to proper position for your cartridge. The earth ground is a safety feature and must NOT be removed for any reason. If the power board is grounded + to - the entire power supply will fail. You must unload the system with a 100 ohm resistor before attempting any work. If you have no electrical knowledge have the work done by some one who does or email auralthrillsaudio@gmail.com Some units have a ground lift switch on the back. Try both positions and use the one which is the most quiet.
Units are shipped set up for MC unless otherwise requested.
Pins are off when positioned by numbers and on when pushed away from numbers. MM has pins 1-6 off. Dip switch pin 7 is switched on. All others are off. To change unit to MC turn pin #6, and #2-5 on. (choose impedence) #7 and all others are off. (Switches are numbered from left to right on left switch. Right switch is upside down.) Impedance is automatically set in MM mode. Switches 2-5 act basically like a tone control in MC mode. You may change them while unit is on. Use only one at a time. They are in off position when using MM. Switch #1 is not used.
Leave top off and plug into electrical outlet. (No cord is provided. Any computer cable will do but I recommend one of my power cables.) Do NOT hook up to your system until phono amp is turned on and working for a few minutes. Tubes will light up and get hot. Turn on using switch on front. Up is on and down is off. Tubes should slowly light up. Leave on for a few minutes and if all is well turn off and proceed to hook up your cables as shown above.
You can change loading of MC on the fly. Turn power off to change from MC to MC. I recommend the use of an insulated screwdriver and insulated needle nose to avoid any shock.
Dip switch settings: Please remember that the left dip switch and right dip switch are reversed. Off is toward numbers on switch. On is away from number on dip switch
MM On #7 All others off Input cables connected to MM in
MC On #2-5 (choose one),#6. All others off Input cables connected to MC in
MC impedance settings #2-2.7k, #3-1.2k, #4-510, #5-100, #1 is not used
Please note the following. This phono stage is extremely detailed in performance as well as set up. It may take some work to get it set up properly. It will show any weakness in your system by sounding bad. IT IS NOT THE PHONO AMP. The amp has been tested on my system prior to shipping. It does not have any hums or strange sounds. It is so neutral that it will show any problems in your system. Please do not tell me that your other phono pre does not do this or that. It is not relevant. Most phono amps color the sound with a sound of their own. This will cover up sounds that you may hear with my amp. A good example is when my records sounded very dull. I knew that I had some 1950's tubes in my power amp that were getting warn out. My system sounded fine on everything but the phono. Must be the phono stage, right? I replaced those tubes with some new ones and low and behold records sounded great again even though I had done nothing with the phono amp. When set up properly this amp will give details and sounds that you have never heard before. When anything in your system is not right this amp will let you know.
Output
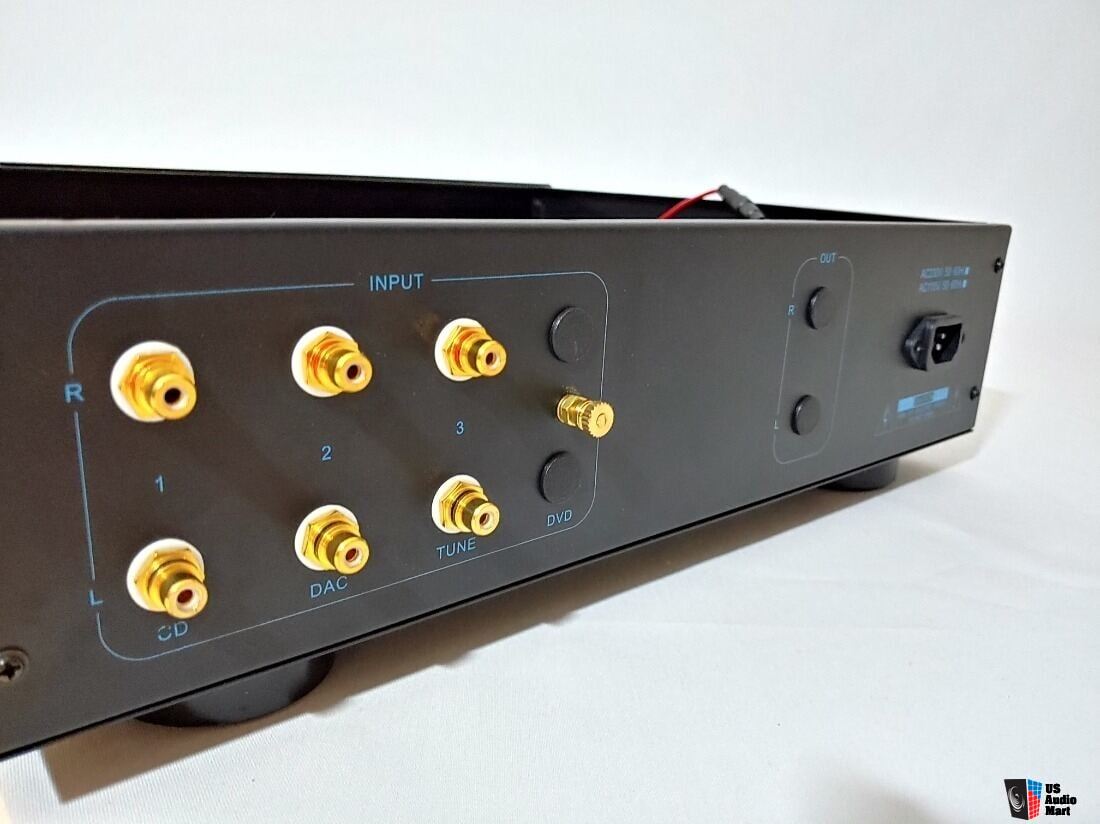
MM input
MC input
Ground
Troubleshooting
Please note that all tube amps are very sensitive to proper grounding. If the table, cartridge and arm are not grounded properly you will create a ground loop. This will result in a hum or hiss until corrected. Nothing is wrong with the unit. They are thoroughly tested before shipment. If they had any noise I would not ship the unit. Even if your present amp does not have a hum you can still have a ground loop in your turntable when connected to a different phono preamplifier. This is an all tube amp. It has no electrical decoupling from the turntable. Most others have a step up transformer, FET amplifier, etc. which will electrically isolate the turntable from the phonostage. All parts on the board have been soldered from underneath. Looking at the top of the board will only show solder that may have wept through the hole. With proper detective work it is easy to find the fault. You must isolate each component. Start my using just turntable pre amp and amplifier. nothing
It carries a 1 year warranty on all parts except tubes. As with any tube amplifier the tubes themselves cause the most troubles. NOS tubes are now getting 50 years old. They may sound good but have a very high failure rate. I can not be held responcible for the damage they may do to your system. Warranty work must be done at an authorized repair shop. I will pay for diagnosis and repair if unit is at fault. Owner will pay for shipping and diagnosis if no fault is found with the unit.
The tubes themselves are the first thing to check if you have any problems. Are they lighting up? If not check the power fuse and make sure it is plugged in. If only one channel is out, reverse the position of the tubes and see if the problem is also reversed. That will show if you have a bad tube. Use only shielded cables as short a length as possible. Using long cable runs may cause impedance mismatches which will result in severe distortion.
Tube amps can pick up electromagnetism from outside sources. This shows up as a hum. Power transformers are like mini broadcast towers. Power cords also are well know for the signal they radiate. For this reason it is very important that signal carrying cables are routed away from these potential noise sources. Do not run signal cables parallel to power cords. If you have to cross a power cord do so at 90 degrees. Mounting the phono amp too close to another EMI component may also cause it to pick up a hum. Hum's are the bane of mankind and tube audio.
A hum can also be caused by an incorrect or dirty ground. A ground loop can be created by hooking many components. The noise goes in a circle around your equipment grounds instead of going to earth ground. It is not as tough as it sounds and once done right, little more attention is required.
White noise is usually caused by a bad tube. Try reversing tubes from side to side. If you are getting white noise in MC mode from both channels try a different load setting.
Tubes and their pins need to be very clean. Remember that the first signal pin has to conduct .5mV or less. I recommend the you remove the tubes and clean each socket with electrical cleaner and one of those brushes used for teeth cleaning.